Are You Sitting Comfortably?

In sessions we are often trying to ‘undo’ or improve on aches & pains (limitations) we have, whether it be through bad alignment or injury. Both of these are usually caused by having poor alignment resulting in our inability to maintain a sustainable functioning muscle balance.

If much of your day is spent sitting or sedentary  your body will be cast into that shape, there will be adaptations which define your body as ‘a sitter’ – even if you did a ‘workout’ (whatever that may be). What you do for the majority of your day will dictate how your muscles are conditioned. There will be specific movement pathways that your lifestyle does not expose you to due to ‘modern living’ & in particular the time saving devices we now have at our disposal e.g shopping online instead of walking to the shops & carrying it home, buggies, washing machines, cars etc.

In order to counteract this we need to look at steps we can take to change our environments to afford more movement time, different working postures or movement breaks spread out across the day.

14322757_1152367408139894_4920083886017136014_n3 steps to improving your ‘sitters body’.

  • Work on corrective exercises to help counter the effects of sitting.
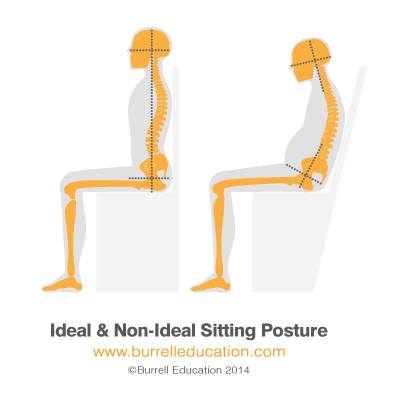
  • Try to sit & do the movement we’re already doing with better alignment. See the picture on the left for ideal sitting alignment.
  • Look at ways we can change our environments & lifestyles to incorporate more activity where possible.


Take a look back at my post on 6 Ways to Stretch at Your Desk for some ideas on how to counter desk sitting.

Upper Back Mobiliser

Modern living tends to cast our bodies into a forward flexion bias stiffening & restricting movement of the upper back, neck & shoulders. It seems to be one of the main complaints & one of the things most class participants would like to relieve. 

The thoracic spine (upper, mid back) provides much of the rotation & extension of the spine but thanks to lifestyle factors such as looking (down & forward) at phones or computers, driving, leaning down over children or  poor posture it tends to get very restricted. Anyone that plays sport is likely to find their performance limited by stiffness in this part of the spine  & it’s common to get compensation injuries in other parts of the body as a result.

Typically a stiff thoracic can cause pain between the shoulder blades but also transfer excess loads onto the lumbar spine, neck & shoulders, which in turn can lead to pain in these areas as well as headaches. A stiff thoracic spine will also result in the Old Hunchback of Notre Dame look (!) & lead to a Dowager’s (or Bison’s) Hump – a thickening of the soft tissues at the base of the neck. So, some good reasons there to keep up with some basic maintenance to keep it supple!

In the classes we work through a few different exercises both in side lying & on all 4’s to help mobilise the thoracic spine & then follow up with some strengthening work to help keep the spine aligned. Here’s one of those exercises that’s really effective as the ground ‘fixes’ the hips which will give you a better chance at rotating correctly through your thoracic instead of cheating with another joint deformation.

Thread the needle pilates_16

pilates_16a

Make sure you have your knees hip width apart & hands, shoulder width apart. Don’t collapse your supporting shoulder / shoulder blade as you bring the other arm under & as you reach up try to really extend through the arm (….mine is bent, probably from too much baby holding!). Try 10 on each side, exhaling as you extend the arm up.

Test Your Balance, Part 2

As a continuation of the post I did on testing your balance part 1 I wanted to add a simple continuum of exercises from easy to hard that you can practice & use to challenge your stability.


So as aforementioned in part 1 the goal of these balances is to test your proprioceptive balance system – that does’t mean using strategies such as bending your knees or holding your arms out high wire style…or fixing your eyes on something, it’s about testing your own internal balance system with your body in the correct (or as close to correct) standing alignment.

pilates_16cYour body uses your proprioception system to create an image of what is internal or inside the skin – in much the same way as a dolphin uses sonar or an animal uses it’s whiskers. Proprioception literally means ‘ones own perception’ & that information about change of skeletal position travels by our neurones to the brain to act on. The more muscle fibres you have firing & the more supple (not tight) the tissue, the better the proprioception.

When you practice these consider your alignment: stand with your feet hip width apart & the outside edges of your feet straight. Back your pelvis up over your heels keeping your ribs aligned over your pelvis. Then draw your head back over your spinal column. When you come on to single leg balance make sure you push down into the floor with the standing leg as opposed to hiking the low back/hip up on the non-weight bearing leg.

1. 2 foot balance eyes open
2. 2 foot balance eyes closed
3. 1 foot balance eyes open
4. 1 foot balance eyes closed
5. 1 foot balance eyes open with head turns
6. 1 foot balance eyes closed with head turns

Test Your ‘True’ Balance, Part 1

From time to time in class we focus on standing balance – it’s a good way to test all the principles we practice throughout the classes & as an indication of general muscle balance health. So I wanted to use this post to look at what goes on when we try to balance, how to test it & how to improve your ‘true’ balance.
So our body’s stabilise by using the relationship between the proprioceptive system (that’s information coming from the muscles, joints & tendons) & the processing of that sensory input (i.e. what the brain tells the body to do with that information). Tight or shortened muscles send ‘fixed’ information from your proprioceptors and this data/sensory input gives incorrect information to the decision centre (the brain) which in turn acts on this mis-information. The outcome is an overcorrection, a wobble or lurching movement in an attempt to stabilise you. Any restrictions or sub optimal muscle length tension will alter the correct information given to the brain.

Testing your ‘true’ balance – See how well you’re balancing with these simple tests.

pilates_16dStand with your feet pelvis width apart & check your feet are straight (as in the outside edges, see pic) – how does this feel? Any wobbles? Now close your eyes & see if there’s any difference with them open or closed. Maybe you felt you moved about more with your eyes closed – this is the ‘true’ part of the balance test – your eyes are not part of the sensory input we speak about when we mean whole-body balance, they are not part of the proprioceptive system they are part of the vestibular system (eyes & inner ears) but the poorer your proprioceptive system is the more you rely on your eyes to make corrections. So in order to stop the eyes doing all the work (& incurring eye muscle fatigue, dizziness & age-related changes in vision) you need to fix your body’s internal sensory input or proprioceptive system.

The progression to the 2 foot balance with eyes shut is to come onto a single leg with eyes shut. Whilst we may have some muscle tension issues within the body it’s also our inability to process information through our feet & inform our bodies of correct posture, due to footwear that down trains our proprioceptive system. Think any type of heel, thick inflexible soles & too narrow toe boxes.

So hopefully this will give you a clearer idea of what you are aiming for when you consider/assess your balance – test yours & practice some ‘eyes shut’ standing to monitor your progress.

How To Lift Properly

I’ve adapted this from a list included in Isa Herrera’s book ‘Ending Pain in Pregnancy’ (a must read if you’re expecting!) even if you’re not pregnant you can be sure that following advice given to a demographic with arguably the most compromised core system out there has to result in the gold standard in lifting advice!!

  • Bring the load/Object Close: Bring your body as close to the load/object you are about to lift as possible. This will prevent you reaching too far forward to grab the object, placing increased stress on the low back. You want the object almost directly underneath your body before you lift it.
  • Wide base of support: You want a wide base of support when you lift objects to improve your balance & allow you to reach the object without straining the back or legs. Widen your stance & try to keep your toes out, as if you are about to straddle the object.
  • Squat down & bend your knees: To reach the object, you will need to squat down by bending your knees. The most important aspect of squatting down is maintaining a flat back with a slight lumbar curve or arch. This is what helps the jelly in the vertebra stay centred, placing less stress on the intervertebral discs.
  • Keep the load close: When you grasp the object, bring the load as close into your body & stand up with your back remaining straight up & down.
  • Take steps, do not rotate: Do not rotate, or twist your trunk to place the object on a different surface. Instead, take small steps with your legs to reposition your body. Set the object down using the same principles.

Remember, proper body mechanics take time but by mastering these steps you’ll prevent aggravating existing problems & reduce risk of future injury.

5 Core Exercises To Practice

Regular conditioning of your core with proper muscle activation is key to maintaining good alignment & preventing back, neck & shoulder pain. This post will be a reminder for some of the exercises I teach in the classes as well as add a bit of variety for home practice.

post2First make sure you create space & time to focus on your technique – you will need to use your brain to find the right muscles (!) – predominately the co-contraction between transversus abdominis (TVA), pelvic floor & multifidus AS YOU EXHALE!

Try this technique to engage with your TVA:

Lie on your back with your spine in a neutral posture (slight curve in lower back). Take a breath in & as you exhale think about lifting your lower tummy up (not sucking in) & *gently* drawing your tummy button toward your spine – you should not feel any movement of your hips, pelvis or spine & you can feel the TVA activate by placing your fingers on the inside of your hip bones. It should feel like a deep tension not so much that it pushes your fingers away.

Try holding this contraction for 3-5 seconds & then release – breathe throughout this exercise! Repeat & hold for 3 sets of 10 repetitions 3-4 x a day.

Once you’ve mastered this you can apply it to all movements/exercises that involve any level of effort. Just remember to go with the breath pattern always exhaling on exertion to benefit from the intrinsic TVA contraction, tensioning your abdominals & lower back muscles.

So here are 5 exercises to practice whilst integrating TVA & pelvic floor activation through different planes of movement:

1. Single leg extensions: Lying with your spine in neutral (slight curve in lower back) ‘bolt’ your tailbone down as you lift knees up to 90 degree. Moving with the breath exhale as you drop one toe to the floor. Repeat, alternating legs for 10-20 x as along as you have good control with no bulging/doming abs.

2. Ball roll outs: From kneeling with shoulder ‘set’ roll forward until you feel the hips open at the front. Make sure you engage your core (as above) to keep the spine in neutral. Repeat 10-20 reps as along as you have good control with no bulging/doming abs.

3. Squats: Inhale as you go down & exhale to go up, move with the breath. Try to keep your spine neutral by untucking your pelvis an& make sure your knees don’t extend over your toes. Repeat…all day long!!

4. Knee lifts: From all 4’s with shoulder set exhale as you engage core & hover the knees. Repeat 10-20 x

5. Side Lift: Assume the position in last pic, inhale & prep core then exhale to lift the top hip up. Try to keep the supporting elbow under your shoulder (mine’s sliiiiiiiightly forward!) Repeat 10-20 x both sides.

Remember you don’t need to do specific ‘ab’ exercises – rather learn to & actually use your core muscles throughout your daily activities. Crunches will merely retard the body’s correct muscle balance.


Pelvic Floor Exercise Progressions

You may need to strengthen your pelvic floor as part of some injury rehab, as part of your post partum recovery or for continence problems – one of the best ways to begin the road to recovery & full core restoration is by doing Kegels but how do we progress from there?

First let’s look at why the pelvic floor plays such an important role in our core restoration. Strengthening your pelvic floor will underpin any fitness goals you have, be they running, fat loss or just daily life. It’s worth noting that 48% of primiparous women & 85% of multiparous women experience some degree of incontinence also worth noting is that incontinence is the second most common reason after dementia for admission into assisted living. So pelvic floor exercise is crucial!

Initially & in fact after any injury the first place to start rehabbing a muscle is by being able to isolate the area in the first place. If your brain can’t access the neural pathway then moving on to a more complex movement will retard healing. So this is where a traditional Kegel (think, stopping flow of urine) is very helpful, a basic switching on & switching off of the muscle. Doing this will also help promote blood flow to the healing tissues & therefore aid the restoration process. If you find you can’t feel anything or you’re at all concerned get a proper exam by a women’s health physio who will be able to tell what’s going on.

This protocol will work well for that initial 6 week period post partum – you should feel the muscles getting stronger & easier to contract. Make sure you fully relax the pelvic floor between contractions as having a hypertonic or too tight muscle isn’t helpful either! Use your breath & visualisations to help you maximise the connection – so as you exhale, squeeze, as you inhale, relax. You can see from the diagram above how the pelvic floor muscles lie across the bottom of the pelvic cavities & this should give you an idea of what you are trying to access & also how important it is to have some muscle tension supporting the bladder, vagina & bowel.

Progress it by using pelvic floor activation as you lift & move, this is a key part of your on-going restoration. If you can protect the pelvic organs using the pelvic floor muscles as you add load (baby, laundry, you, buggies etc) you will prevent that added intra-abdominal pressure causing further stress on the pelvic floor leaving yourself vulnerable to pelvic organ prolapse or stress incontinence. This in turn will further strengthen the muscle’s function.

Note: Whilst I’m fully aware that men have pelvic floors too (!) this article is geared more toward women – hence the references to wombs & vaginas etc!