3 Restorative Shoulder Stretches

If you have tight shoulders & are looking for relaxing ways to ‘unstick’ them here’s a few ideas that we use in the classes that also work really well particularly as transitions from one exercise to another. If you imagine where your arms are hanging most of the day & the range with which you mostly use them in you can see that these 3 variations on a shell stretch really take them into much more of an unused plane thereby freeing up all the stuck tissue around pectoralis & latissimus dorsi.

shell_4

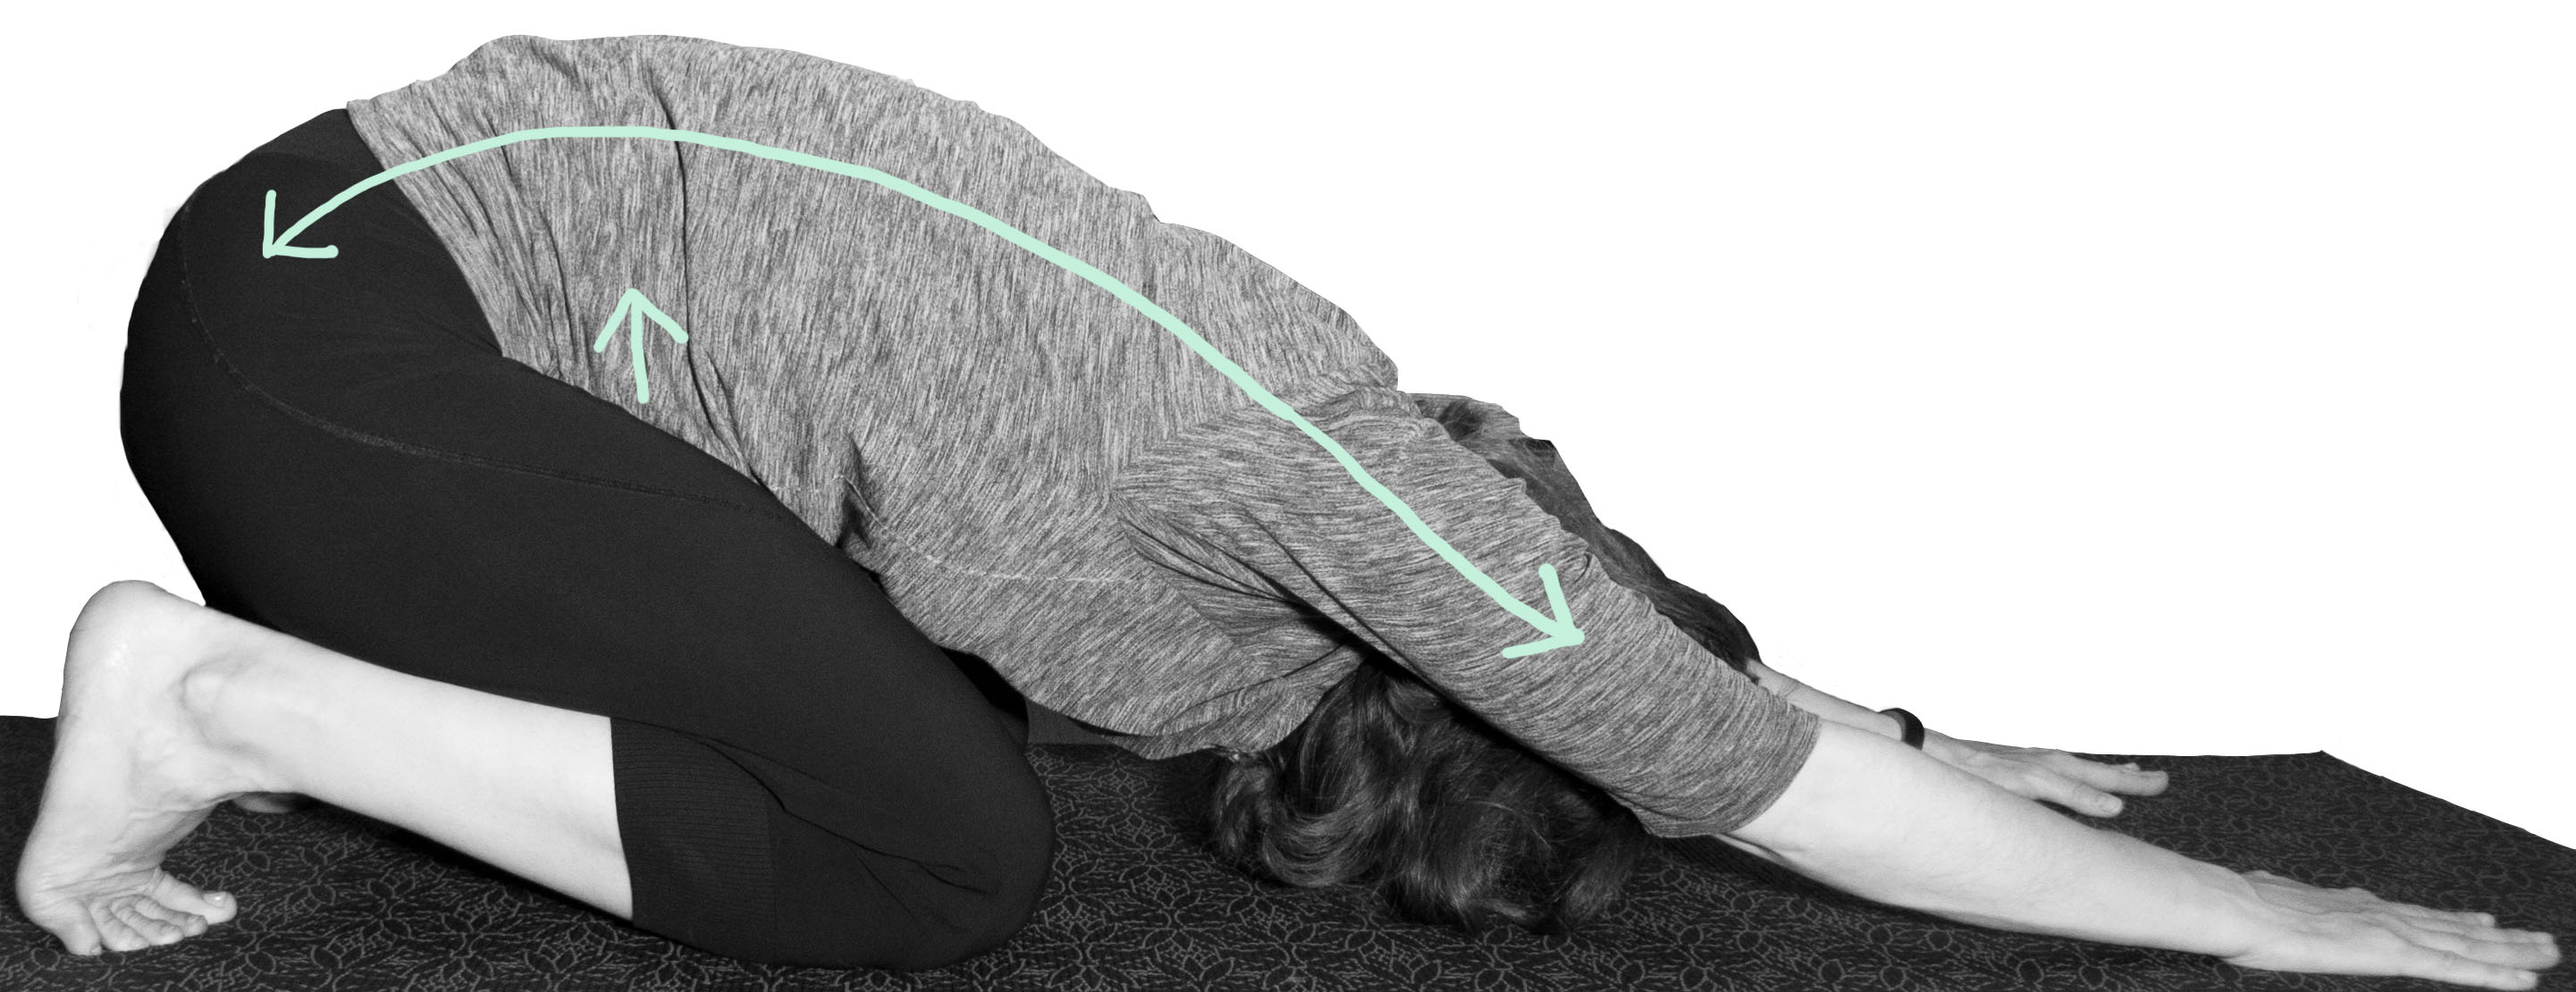
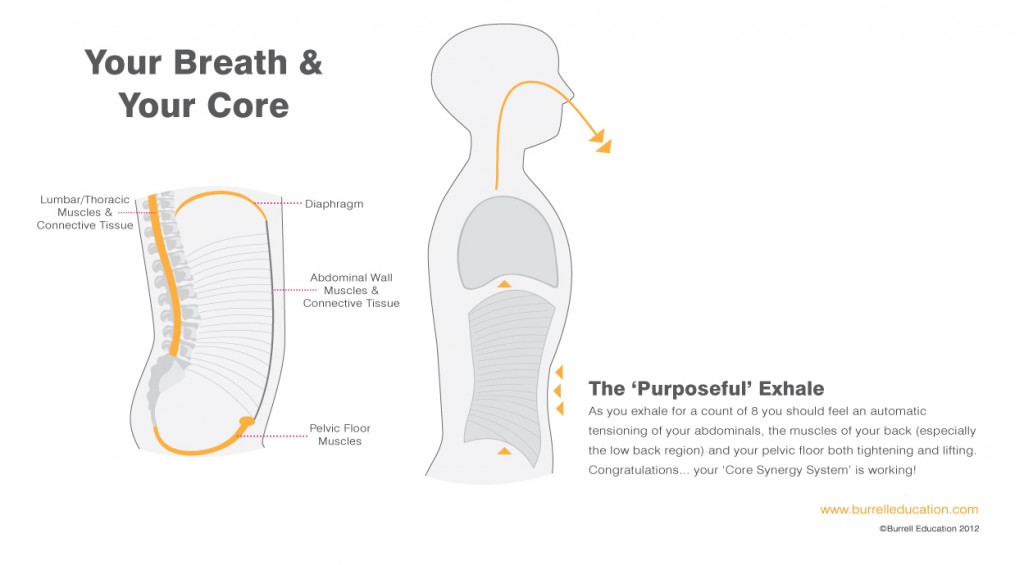
The picture above shows how you should anchor the stretch. Arms are pushing away into the mat & sit bones are pulling down, so you’re flexing the lumbar/lower spine by engaging the abdominals & pulling the ribs up (in the direction of the second smaller arrow). By drawing the ribcage up you will tension the stretch better through the shoulders instead of over extending into the thoracic spine – have a go with the ribs up & then down on your thighs & you’ll feel the difference.

shell_series

If you want to optimise the stretches try to work with the breath by directing it into the ribs & underlying diagram in a 3 dimensional way (think like an accordian). You’ll be able to feel the skin stretch around the rib cage & so try to emphasise that expansion as you inhale & breathe out the tension from the stretch as you exhale.

  • In the first variation the arms are straight out in front, trying to keep the hands in line with the wrists, elbows & shoulder. Head is relaxed, toes are tucked under for an extra, bonus plantar fascia stretch! There are many variations on the specifics of this pose for example Yoga’s Child Pose comes with a different emphasis but here as we are trying to specifically release the fascia around the shoulders I’ve selected these teaching points.
  • In the second picture the arms are externally rotated with the palms up & correspondingly the forearms are also rotating outward – you will feel how this tensions the stretch differently & you’ll probably find it more of a challenge. See how far round (or not!) you can get your thumbs/backs of the hands flat to the floor! Head relaxed & breathing wiiiiide! Keep thinking about the same anchor points, this is not a flop-on-your-thighs-&-go-to-sleep kind of stretch, you want to be actively working on the position both with the breath & with the anchor points. As the intensity of the stretch dissipates you can try to reach a little further.
  • Lastly we’re working more laterally into the sides of the back by bringing one arm all the way across & anchoring onto the the other side. This time we breathe into that side – feel the skin stretch & try to expand it with each inhalation.

For more information or to attend one of my sessions get in touch & fill out my contact form!

……And Breeeeeeathe!!

Different Pilates teachers put different amounts of focus on the breath  & whilst it can add to the seemingly endless checklist of things you are trying to get right in an exercise. For me, it is key to the success of any core restoration & here’s why.

Once you understand the body’s breathing apparatus & functionality it becomes quite clear that we get an intrinsic core contraction (tensioning) with each exhale & an intrinsic expansion (or opening) with each inhale so only by harnessing this inherent bodily function will we truly get the core working optimally. Working against this pattern will help facilitate back pain, exacerbate a diastasis recti & generally leave you vulnerable to injury.

Your-Breath-Your-Core-1024x565

But as well as providing an intrinsic support system for the body, breathing correctly also helps reduce stress – controlled breathing can cause beneficial physiological changes that include:

  • lowered blood pressure & heart rate
  • reduced levels of stress hormones in the blood
  • reduced lactic acid build-up in muscle tissue
  • balanced levels of oxygen & carbon dioxide in the blood
  • improved immune system functioning
  • increased physical energy
  • increased feelings of calm & wellbeing.

Conversely when a person is under stress, their breathing pattern changes. Typically, an anxious person takes small, shallow breaths, using their shoulders rather than their diaphragm to move air in & out of their lungs. This style of breathing disrupts the balance of gases in the body. Shallow over-breathing, or hyperventilation, can prolong feelings of anxiety by making the physical symptoms of stress worse as well as facilitate adaptively shortened muscles along the neck & shoulders.

Try practising the breathing exercise described above whilst lying on your back in a quiet area – then begin to introduce some gentle core exercises as you do so & see how well incorporating the breath helps engage the whole core system.

5 Core Exercises To Practice

Regular conditioning of your core with proper muscle activation is key to maintaining good alignment & preventing back, neck & shoulder pain. This post will be a reminder for some of the exercises I teach in the classes as well as add a bit of variety for home practice.

post2First make sure you create space & time to focus on your technique – you will need to use your brain to find the right muscles (!) – predominately the co-contraction between transversus abdominis (TVA), pelvic floor & multifidus AS YOU EXHALE!

Try this technique to engage with your TVA:

Lie on your back with your spine in a neutral posture (slight curve in lower back). Take a breath in & as you exhale think about lifting your lower tummy up (not sucking in) & *gently* drawing your tummy button toward your spine – you should not feel any movement of your hips, pelvis or spine & you can feel the TVA activate by placing your fingers on the inside of your hip bones. It should feel like a deep tension not so much that it pushes your fingers away.

Try holding this contraction for 3-5 seconds & then release – breathe throughout this exercise! Repeat & hold for 3 sets of 10 repetitions 3-4 x a day.

Once you’ve mastered this you can apply it to all movements/exercises that involve any level of effort. Just remember to go with the breath pattern always exhaling on exertion to benefit from the intrinsic TVA contraction, tensioning your abdominals & lower back muscles.

So here are 5 exercises to practice whilst integrating TVA & pelvic floor activation through different planes of movement:

1. Single leg extensions: Lying with your spine in neutral (slight curve in lower back) ‘bolt’ your tailbone down as you lift knees up to 90 degree. Moving with the breath exhale as you drop one toe to the floor. Repeat, alternating legs for 10-20 x as along as you have good control with no bulging/doming abs.

2. Ball roll outs: From kneeling with shoulder ‘set’ roll forward until you feel the hips open at the front. Make sure you engage your core (as above) to keep the spine in neutral. Repeat 10-20 reps as along as you have good control with no bulging/doming abs.

3. Squats: Inhale as you go down & exhale to go up, move with the breath. Try to keep your spine neutral by untucking your pelvis an& make sure your knees don’t extend over your toes. Repeat…all day long!!

4. Knee lifts: From all 4’s with shoulder set exhale as you engage core & hover the knees. Repeat 10-20 x

5. Side Lift: Assume the position in last pic, inhale & prep core then exhale to lift the top hip up. Try to keep the supporting elbow under your shoulder (mine’s sliiiiiiiightly forward!) Repeat 10-20 x both sides.

Remember you don’t need to do specific ‘ab’ exercises – rather learn to & actually use your core muscles throughout your daily activities. Crunches will merely retard the body’s correct muscle balance.