An update on our Men’s Pilates! Every Tuesdays 13:45 – 14:45 at Healthflex, The Edge, Woolmer Hill.
The Men’s Pilates classes at Healthflex are open to all men who are keen to work on their flexibility and core strength. Typically we will start the class with some flexibility and mobility drills reviewing the Pilates Principles which we will layer through all the exercises in the class.
We’ll be working on all the key core muscles involved in improving your balance, alignment and peripheral joint stability and whilst there will be a range of exercises, the Pilates ruleset will remain constant throughout all the classes. This means you’ll be able to transition the same ideas we use in class to align our bodies with your daily activities. For example aligning your spine, breathing out on effort and integrating your core muscles with movement throughout your day. It’s about understanding how to move optimally and creating habits and a practice that facilitate a positive change in the way you move and feel.
Pilates creates a great foundation from which to move and play sports, to rehab, maintain and progress.
For more information do get in contact and for class bring along a mat, water, and ask at the Healthflex Clinic reception about small equipment which we use in class.
I have had an enlightening few weeks studying Munira Hundani’s new course ‘Diastasis Rectus Abdominus and the Postpartum Core’ which for me, presented a fascinating new framework for both assessment and exercise prescription of the post partum core.
Diastasis Rectus Abdominus (DRA) is a widening of the linea alba (the midline of the abdominal wall) experienced by women during and after pregnancy. Whilst it is normal to experience some degree of separation it should generally resolve naturally postnatally however in approximately 1/3 of women the excessive and prolonged widening prevails adding to a sense of disconnection and dysfunctionality .
Commonly the protocol for fitness instructors, like myself, for dealing with DRA is to present a long list of things to avoid to prevent further widening of ‘the gap’. These might include lifting heavy weights (e.g children), sit-ups, plank, boat pose (Navasana) jack knives, russian twists etc for fear of causing too much Intra Abdominal Pressure (IAP) and worse still increasing the gap. The assessment of the DRA would usually be conducted primarily in supine using a head lift protocol and exercise prescription would typically be progressed dependant on the inter recti distance (or width of the gap)
Hudani’s work paints a much more positive picture for the treatment of DRA as well as a much bigger focus on the individualised journey that success should take accessed via the initial assessment. Crucially she demonstrates how clinical research shows that there is little to no correlation between the DRA itself and formally associated issues such as lower back pain or indeed the ‘type’ of exercise a woman should do. Rather than point the blame at ‘the gap’ she explains that the inter recti distance is just a another part of the abdominal wall that has widened as a whole, coupled with altered breathing and core connection strategies resulting in a mis-management of IAP. She goes on to emphasise the importance of IAP and how harnessing it using the diaphragm and the Transversus Abdominus (TVA) is the key to success.
So what does this mean for women with DRA? Well, by assessing the DRA in positions which prompt more IAP (i.e standing or sitting as opposed to supine – which, she explains, is particularly unproductive for those with increased circumferential laxity) it helps to illicit a better provocation of TVA’s true ability to activate and therefore a ‘way in’ to strategise a stepwise approach for that individual. The idea of using and creating IAP to strengthen the core automatically reduces the fear factor around creating too much IAP. Once the re-training of the diaphragm and TVA has successfully been achieved the list of formally avoided exercises are the very ones which need to be integrated in to optimise core and indeed whole body strength. This means your favourite yoga class, HIIT workouts or Pilates classes are once more back on the table.
If you have been affected by diastasis and are looking for ways to help progress do get in touch via the contacts page for more information.
I’ve just spent the last couple of months updating my Pilates for orthopaedic conditions knowledge with FutureFit and wanted to focus a bit on exactly why Pilates is so helpful in the treatment of common orthopaedic conditions. Whilst I don’t solely use Pilates in my movement sessions but instead use a range of functional movement protocol the traditional Pilates principles certainly embody and underpin the main focus of exercise prescription for rehab thereby providing a safe and effective recovery.
Common Orthopaedic Conditions –
Back pain (non specific, specific, root nerve pain, disc herniation and piriformis syndrome)
Arthritis (osteoarthritis and rheumatoid arthritis)
Osteoporosis and osteopenia
Hypermobility
The Pilates mat repertoire gives a great range of exercises which allow for enough regression or progression to take participants with very limited movement capabilities and progress them in a sustainable way. The incorporation of the Pilates principles which are taught alongside each exercise help to integrate the breath with core co-contraction, increase body awareness (and therefore autonomy) and focus on the quality of movement.
A tailored programme can offer you many things – principally better alignment and mobility of the spine but also increased muscle strength and endurance, reduced stiffness and improved flexibility, reduced pain, better balance along with improved well-being.
If you are affected by any of these conditions it’s important to seek out an effective exercise programme which meets your needs and minimises your symptoms. Due to covid-19 I am not currently able to offer sessions but feel free to contact me for further advice.
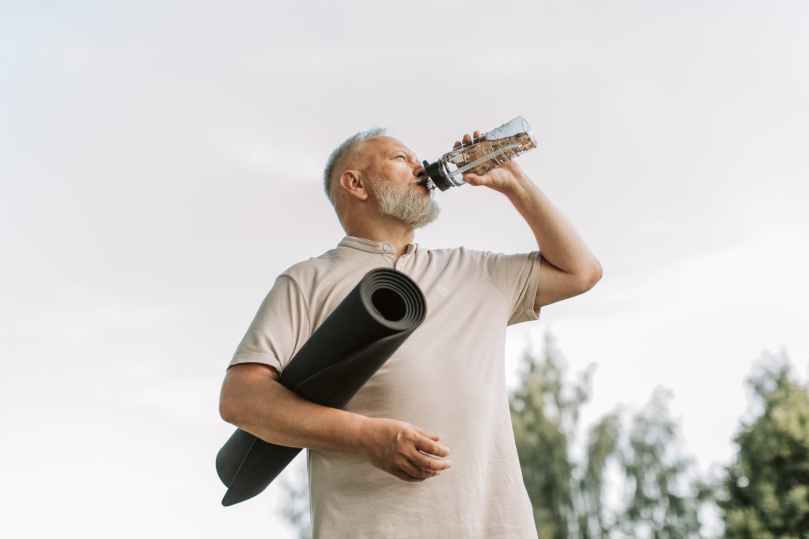
If you travel a lot for work it can be hard to prioritise your own movement let alone specific exercise. This post is an aid to those trapped in their hotel rooms (!) and in need of some body maintenance to cancel out all the sitting, screen watching, suit and work shoe wearing (that also ‘cast’ your body into unhelpful postures).
Chest stretch: Arm at 90 degrees (i.e. bent at the elbow) with your forearm against a wall or door frame the stretch the chest open, away from the wall. One arm at a time then switch.
Door frame: Reach up to a door frame and try to extend your arms whilst breathing deeply lengthening on the exhalations. Try to create space from your ears to your shoulders.
Back extensions: Lying prone, chin slightly tucked – on an exhale raise your chest of the floor a tiny bit whilst lengthening your arms/fingertips towards your feet. Also try to draw your shoulders back as if opening your chest.
Childs pose: Sit back on your heels stretch your arms forward onto the floor.
Hamstring stretch: lying supine stretch one leg up – use a belt or tie around the foot to get leverage (keep the other knee bent and try not to press/flatten your lower back) Switch legs.
Sit ups: support the head if necessary, deep exhale as you come up.
Plank: On your elbows – keep breathing, back of the neck long don’t drop your chin.
Childs pose: same as before but with the palms up.
Note: Written descriptions of exercises and movements can be lost in translation! So if these do not translate easily for you do get in touch via the contact form. Readers who have had been having sessions will recognise the cues!
In sessions we are often trying to ‘undo’ or improve on aches & pains (limitations) we have, whether it be through bad alignment or injury. Both of these are usually caused by having poor alignment resulting in our inability to maintain a sustainable functioning muscle balance.
If much of your day is spent sitting or sedentary your body will be cast into that shape, there will be adaptations which define your body as ‘a sitter’ – even if you did a ‘workout’ (whatever that may be). What you do for the majority of your day will dictate how your muscles are conditioned. There will be specific movement pathways that your lifestyle does not expose you to due to ‘modern living’ & in particular the time saving devices we now have at our disposal e.g shopping online instead of walking to the shops & carrying it home, buggies, washing machines, cars etc.
In order to counteract this we need to look at steps we can take to change our environments to afford more movement time, different working postures or movement breaks spread out across the day.
3 steps to improving your ‘sitters body’.
Work on corrective exercises to help counter the effects of sitting.
Try to sit & do the movement we’re already doing with better alignment. See the picture on the left for ideal sitting alignment.
Look at ways we can change our environments & lifestyles to incorporate more activity where possible.
In Pilates classes we give a lot of emphasis to using the pelvic floor muscles throughout all the exercises but I wanted to use this post to look a bit more specifically at some of the precursors to pelvic floor problems & signs you may be at risk or already have issues.
There are specific signs to look out for which can indicate that you may have a pelvic floor problem – these are all suboptimal issues that you do not have to live with, a trip to the women’s health physio (or men’s) will help get you on the road to recovery just like any other muscle injury. I’ll stress again, these are not just conditions of age or things that ‘just happen’ – you can do something about it, just because something is common does not mean it’s normal.
Peeing when you exercise, laugh, cough or sneeze
Needing to get to the toilet in a hurry or not making it there in time
Loss of control over your bladder or bowel
Accidentally passing wind
A prolapse – in women, this may be felt as a bulge in the vagina or a feeling of heaviness, discomfort, pulling, dragging or dropping. In men, this may be felt as a bulge in the rectum or a feeling of needing to use their bowels but not actually needing to go
Pain in your pelvic area, or painful sex
Being pregnant & childbirth
The pelvic floor is just like any other muscle so if it’s too tight or too weak or a combination problems can occur but there are certain events in life & lifestyle factors that can contribute to creating imbalances or dysfunction. Some people have pelvic floor muscles that are too tight (hypertonic) & cannot relax. This can be made worse by doing squeezing exercises & overworking the muscles without learning how to relax – this is why I always try to give time in the class to focus on actually relaxing & releasing the abdominals & pelvic floor.
The main precursors for pelvic floor problems will involve any type of unmanaged pressure within the abdominal canister or where there is poor load transfer .
History of back pain
Ongoing constipation & straining on the loo
Being overweight with a BMI over 25
Incorrect heavy lifting e.g using the Valsava maneover
Chronic cough or sneeze
Previous pelvic injury
Poor alignment
Wearing high heels
With the right technique & exercise selection, Pilates is a great choice to help strengthen the pelvic floor – at any age, whether you’ve just had a baby or your babies are having babies!
Modern living tends to cast our bodies into a forward flexion bias stiffening & restricting movement of the upper back, neck & shoulders. It seems to be one of the main complaints & one of the things most class participants would like to relieve.
The thoracic spine (upper, mid back) provides much of the rotation & extension of the spine but thanks to lifestyle factors such as looking (down & forward) at phones or computers, driving, leaning down over children or poor posture it tends to get very restricted. Anyone that plays sport is likely to find their performance limited by stiffness in this part of the spine & it’s common to get compensation injuries in other parts of the body as a result.
Typically a stiff thoracic can cause pain between the shoulder blades but also transfer excess loads onto the lumbar spine, neck & shoulders, which in turn can lead to pain in these areas as well as headaches. A stiff thoracic spine will also result in the Old Hunchback of Notre Dame look (!) & lead to a Dowager’s (or Bison’s) Hump – a thickening of the soft tissues at the base of the neck. So, some good reasons there to keep up with some basic maintenance to keep it supple!
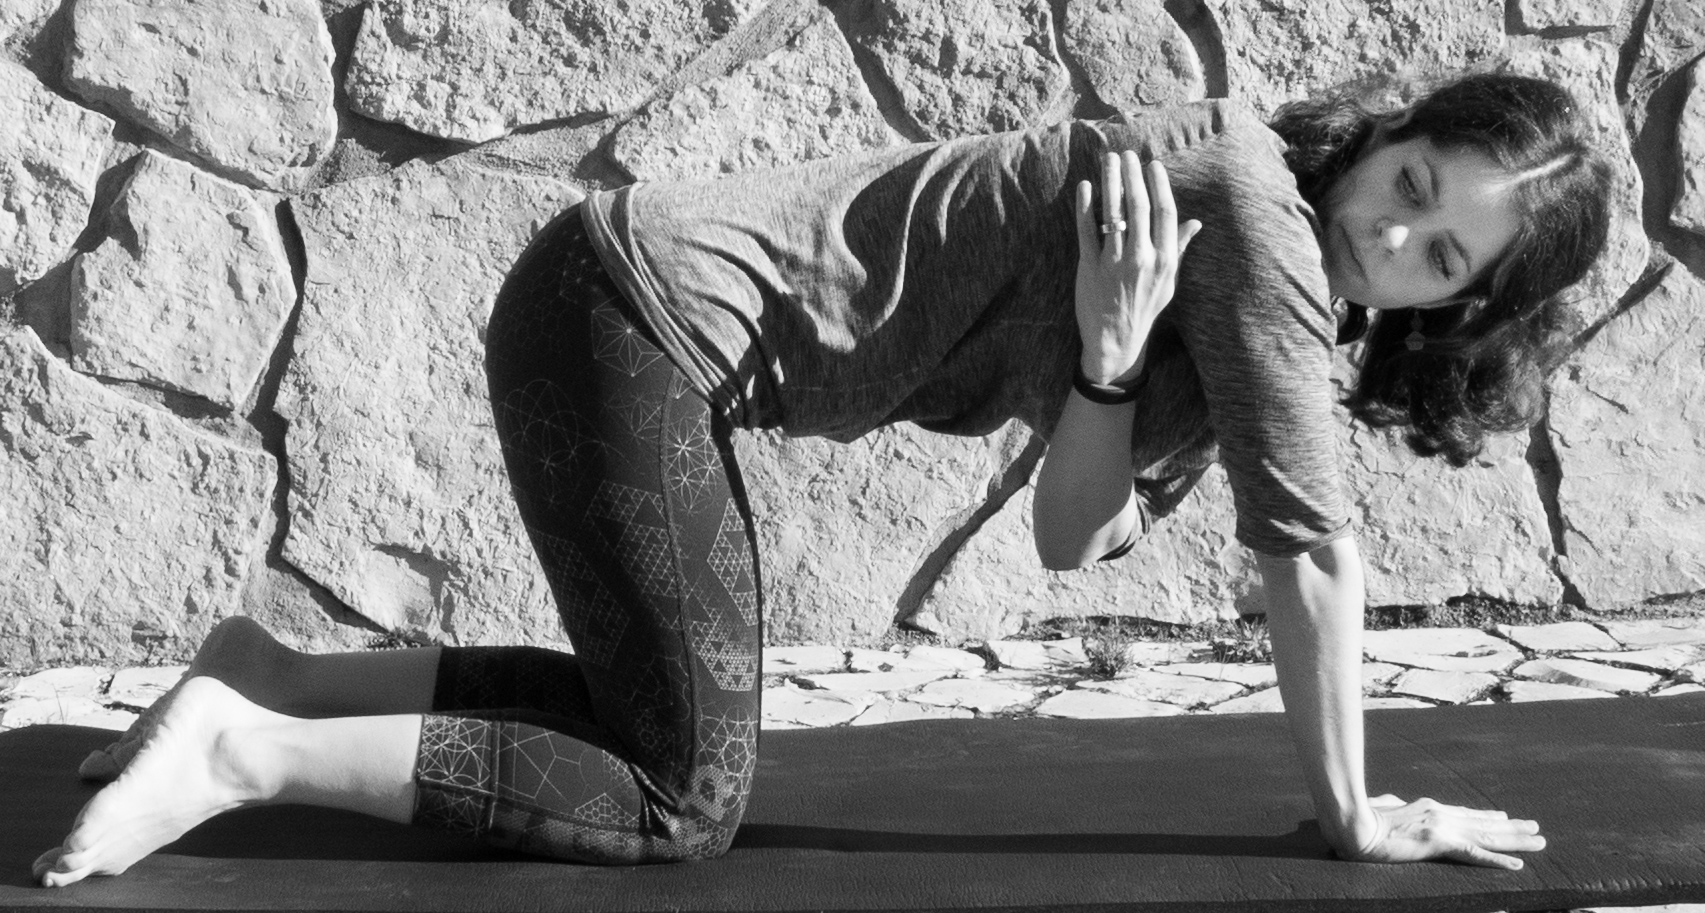
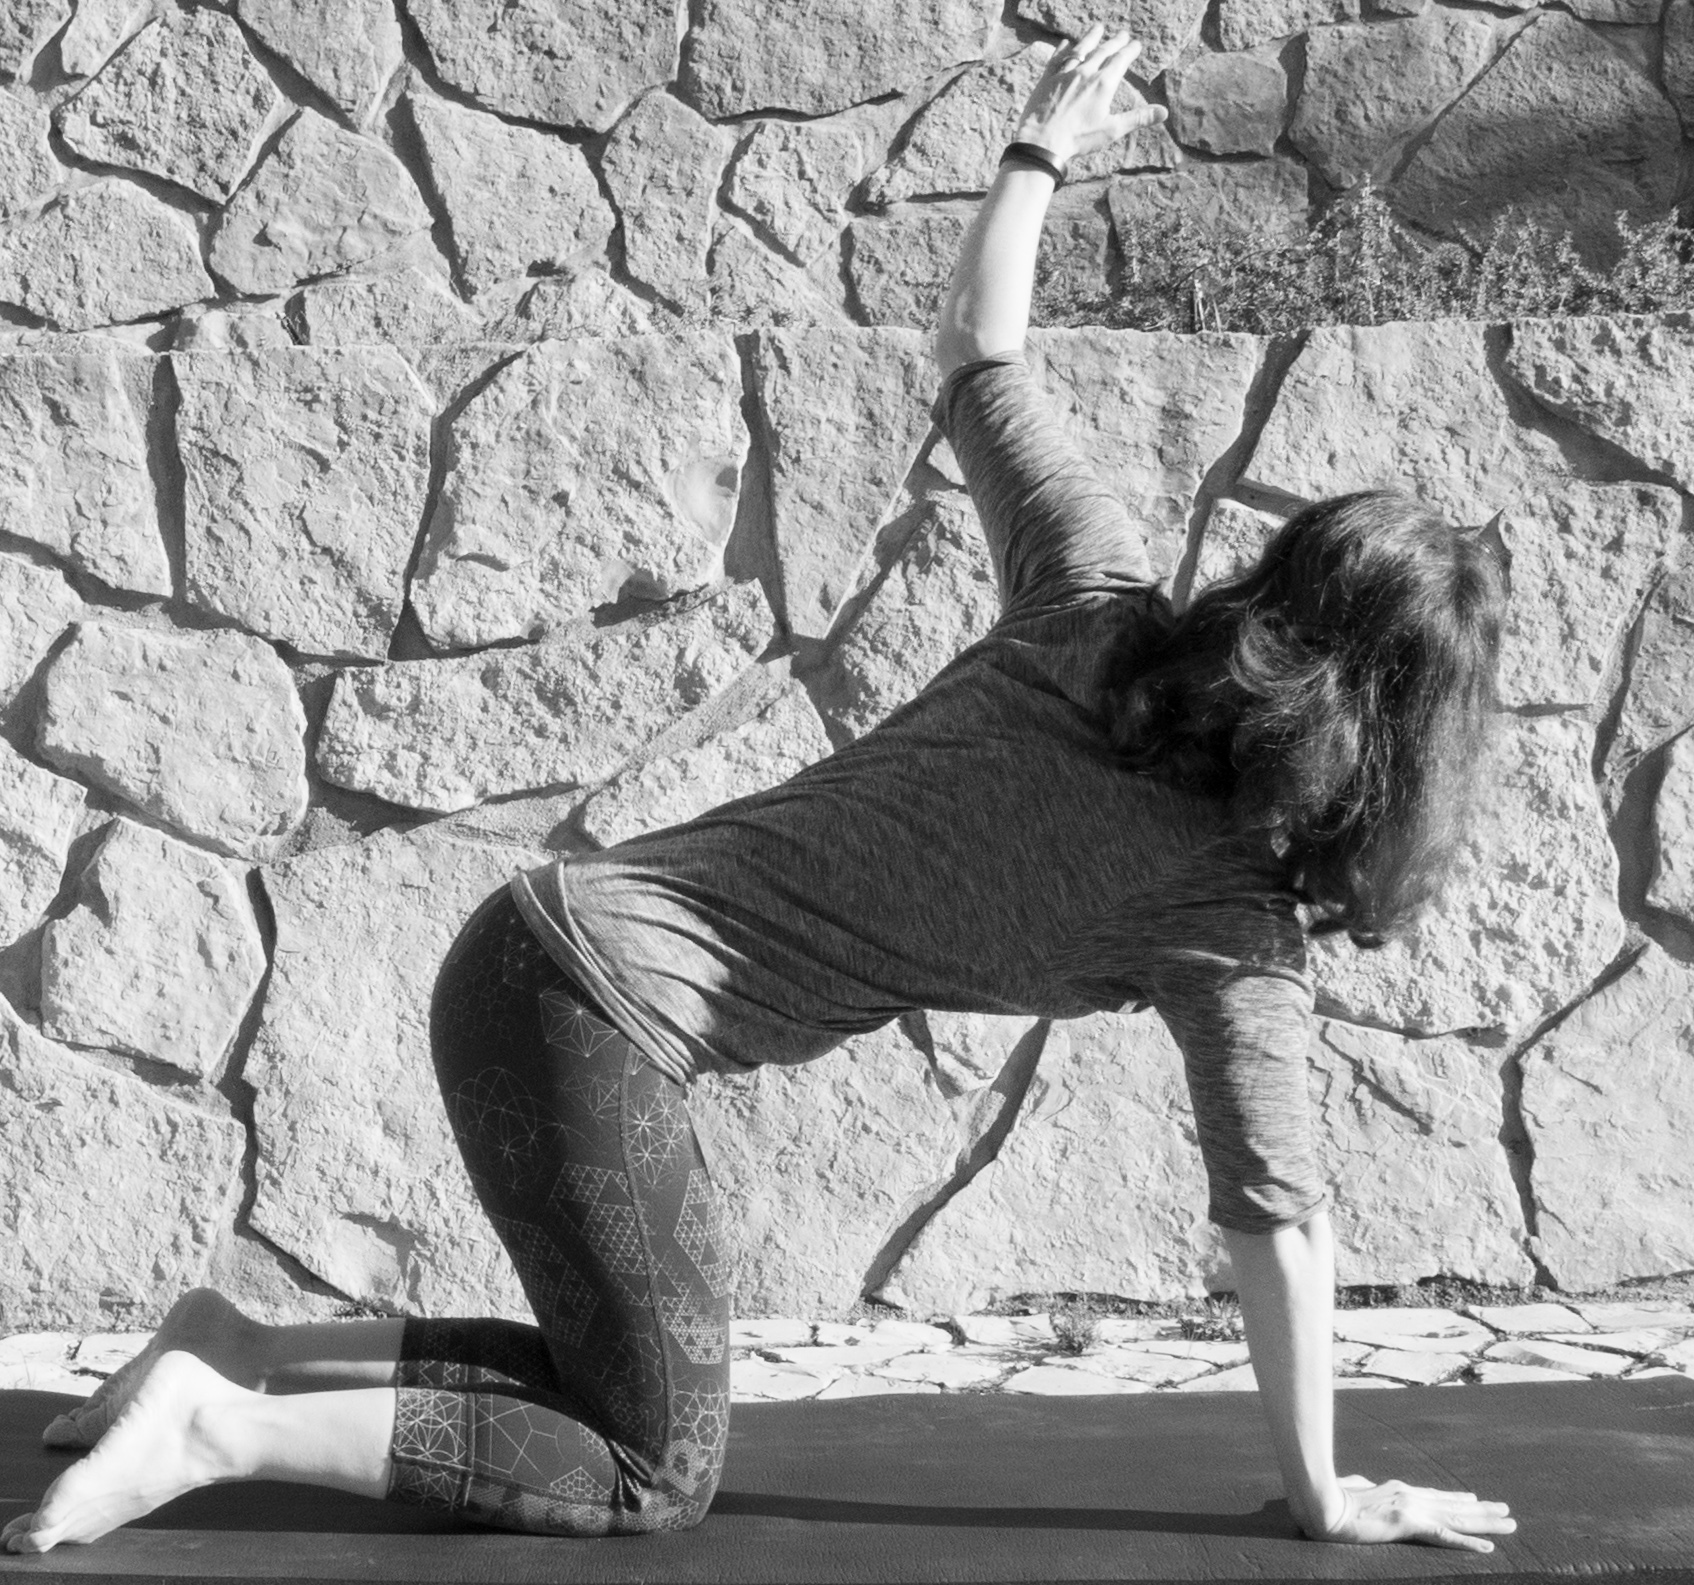
In the classes we work through a few different exercises both in side lying & on all 4’s to help mobilise the thoracic spine & then follow up with some strengthening work to help keep the spine aligned. Here’s one of those exercises that’s really effective as the ground ‘fixes’ the hips which will give you a better chance at rotating correctly through your thoracic instead of cheating with another joint deformation.
Thread the needle
Make sure you have your knees hip width apart & hands, shoulder width apart. Don’t collapse your supporting shoulder / shoulder blade as you bring the other arm under & as you reach up try to really extend through the arm (….mine is bent, probably from too much baby holding!). Try 10 on each side, exhaling as you extend the arm up.
As a continuation of the post I did on testing your balance part 1 I wanted to add a simple continuum of exercises from easy to hard that you can practice & use to challenge your stability.
So as aforementioned in part 1 the goal of these balances is to test your proprioceptive balance system – that does’t mean using strategies such as bending your knees or holding your arms out high wire style…or fixing your eyes on something, it’s about testing your own internal balance system with your body in the correct (or as close to correct) standing alignment.
Your body uses your proprioception system to create an image of what is internal or inside the skin – in much the same way as a dolphin uses sonar or an animal uses it’s whiskers. Proprioception literally means ‘ones own perception’ & that information about change of skeletal position travels by our neurones to the brain to act on. The more muscle fibres you have firing & the more supple (not tight) the tissue, the better the proprioception.
When you practice these consider your alignment: stand with your feet hip width apart & the outside edges of your feet straight. Back your pelvis up over your heels keeping your ribs aligned over your pelvis. Then draw your head back over your spinal column. When you come on to single leg balance make sure you push down into the floor with the standing leg as opposed to hiking the low back/hip up on the non-weight bearing leg.
1. 2 foot balance eyes open
2. 2 foot balance eyes closed
3. 1 foot balance eyes open
4. 1 foot balance eyes closed
5. 1 foot balance eyes open with head turns
6. 1 foot balance eyes closed with head turns
From time to time in class we focus on standing balance – it’s a good way to test all the principles we practice throughout the classes & as an indication of general muscle balance health. So I wanted to use this post to look at what goes on when we try to balance, how to test it & how to improve your ‘true’ balance.
So our body’s stabilise by using the relationship between the proprioceptive system (that’s information coming from the muscles, joints & tendons) & the processing of that sensory input (i.e. what the brain tells the body to do with that information). Tight or shortened muscles send ‘fixed’ information from your proprioceptors and this data/sensory input gives incorrect information to the decision centre (the brain) which in turn acts on this mis-information. The outcome is an overcorrection, a wobble or lurching movement in an attempt to stabilise you. Any restrictions or sub optimal muscle length tension will alter the correct information given to the brain.
Testing your ‘true’ balance – See how well you’re balancing with these simple tests.
Stand with your feet pelvis width apart & check your feet are straight (as in the outside edges, see pic) – how does this feel? Any wobbles? Now close your eyes & see if there’s any difference with them open or closed. Maybe you felt you moved about more with your eyes closed – this is the ‘true’ part of the balance test – your eyes are not part of the sensory input we speak about when we mean whole-body balance, they are not part of the proprioceptive system they are part of the vestibular system (eyes & inner ears) but the poorer your proprioceptive system is the more you rely on your eyes to make corrections. So in order to stop the eyes doing all the work (& incurring eye muscle fatigue, dizziness & age-related changes in vision) you need to fix your body’s internal sensory input or proprioceptive system.
The progression to the 2 foot balance with eyes shut is to come onto a single leg with eyes shut. Whilst we may have some muscle tension issues within the body it’s also our inability to process information through our feet & inform our bodies of correct posture, due to footwear that down trains our proprioceptive system. Think any type of heel, thick inflexible soles & too narrow toe boxes.
So hopefully this will give you a clearer idea of what you are aiming for when you consider/assess your balance – test yours & practice some ‘eyes shut’ standing to monitor your progress.
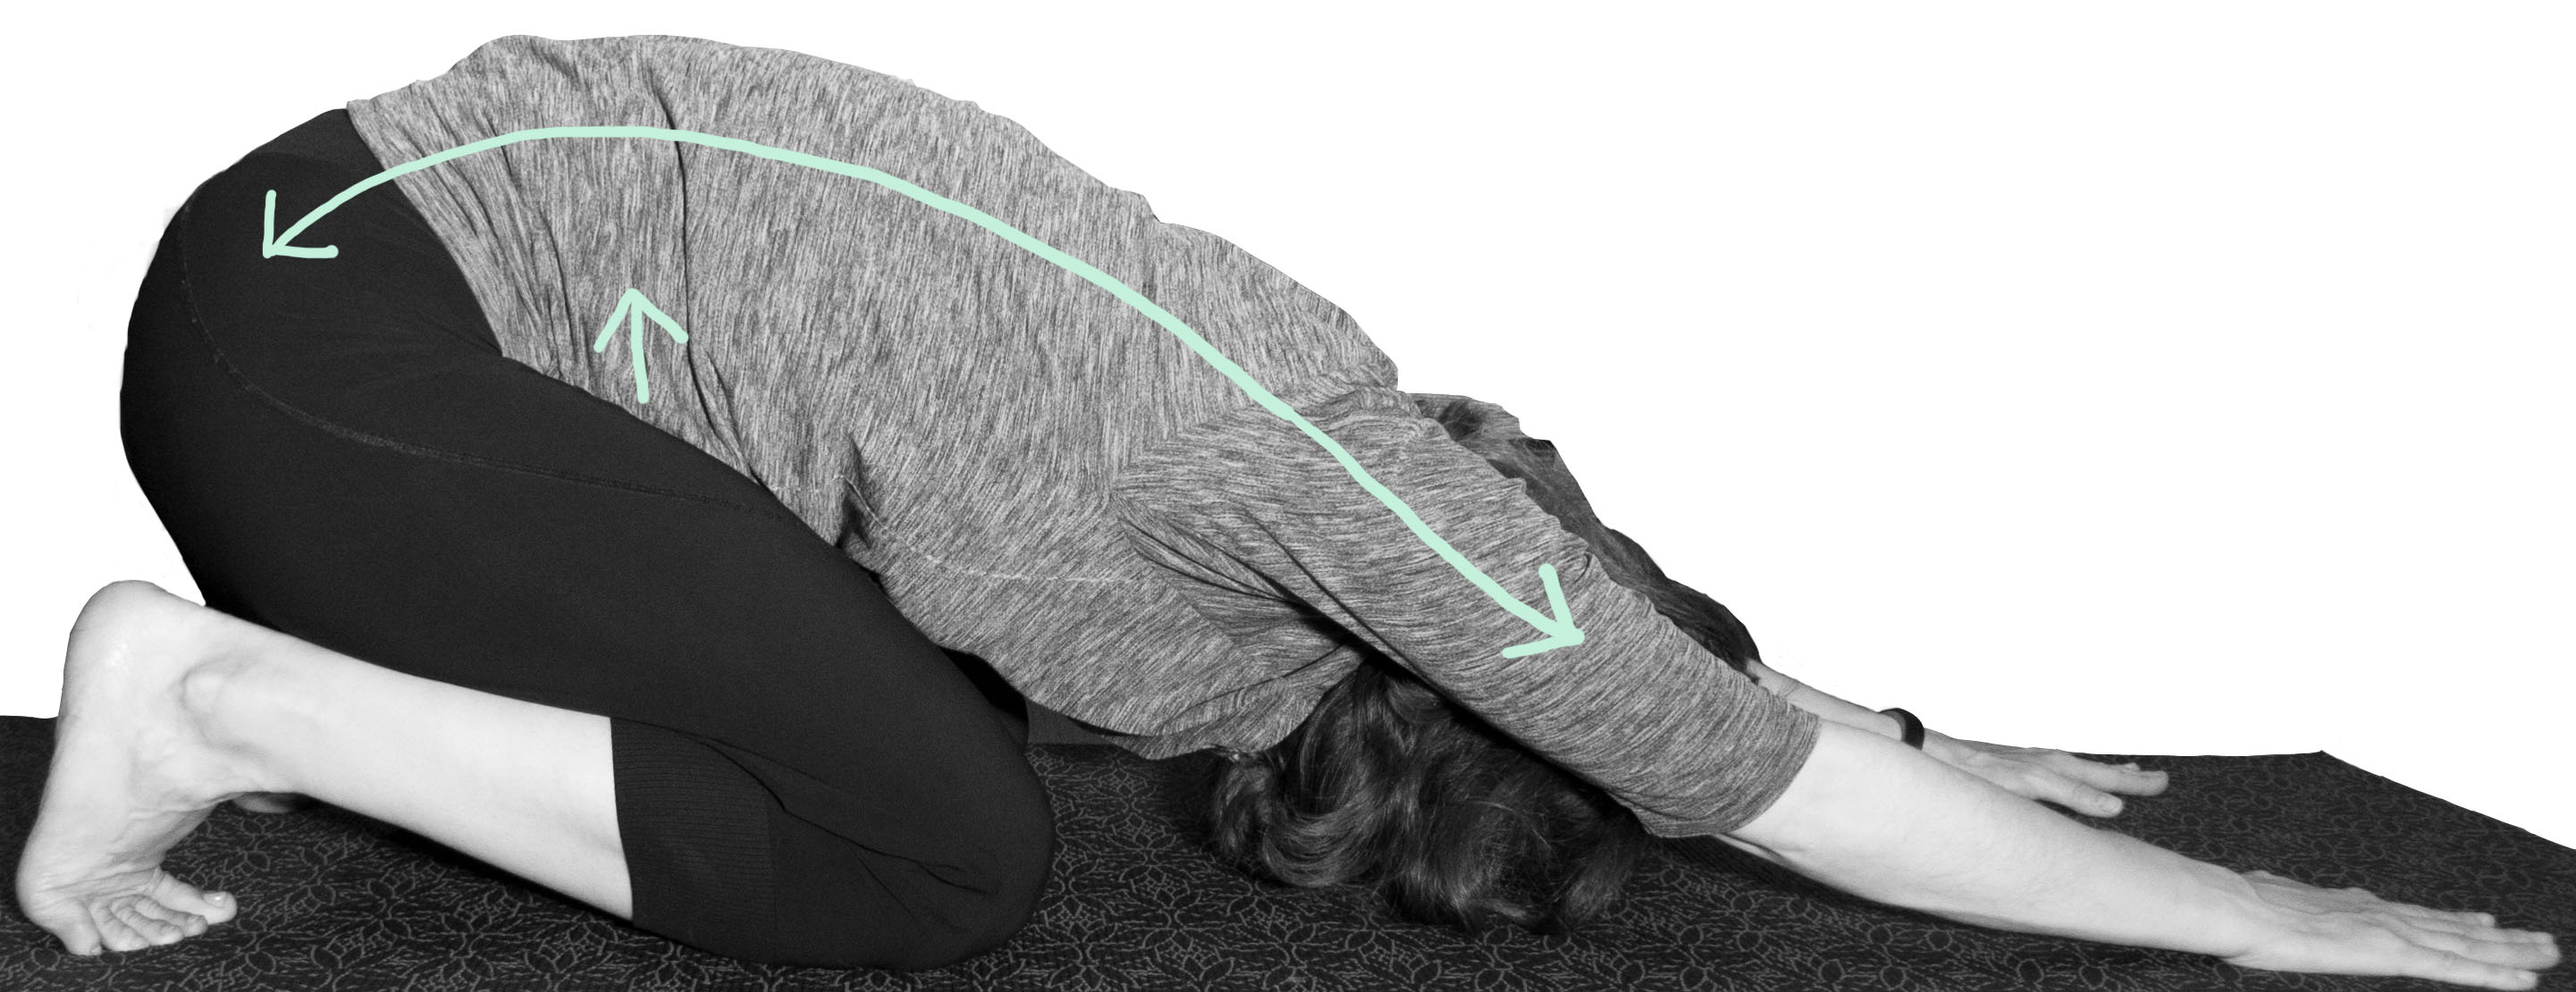
If you have tight shoulders & are looking for relaxing ways to ‘unstick’ them here’s a few ideas that we use in the classes that also work really well particularly as transitions from one exercise to another. If you imagine where your arms are hanging most of the day & the range with which you mostly use them in you can see that these 3 variations on a shell stretch really take them into much more of an unused plane thereby freeing up all the stuck tissue around pectoralis & latissimus dorsi.
The picture above shows how you should anchor the stretch. Arms are pushing away into the mat & sit bones are pulling down, so you’re flexing the lumbar/lower spine by engaging the abdominals & pulling the ribs up (in the direction of the second smaller arrow). By drawing the ribcage up you will tension the stretch better through the shoulders instead of over extending into the thoracic spine – have a go with the ribs up & then down on your thighs & you’ll feel the difference.
If you want to optimise the stretches try to work with the breath by directing it into the ribs & underlying diagram in a 3 dimensional way (think like an accordian). You’ll be able to feel the skin stretch around the rib cage & so try to emphasise that expansion as you inhale & breathe out the tension from the stretch as you exhale.
In the first variation the arms are straight out in front, trying to keep the hands in line with the wrists, elbows & shoulder. Head is relaxed, toes are tucked under for an extra, bonus plantar fascia stretch! There are many variations on the specifics of this pose for example Yoga’s Child Pose comes with a different emphasis but here as we are trying to specifically release the fascia around the shoulders I’ve selected these teaching points.
In the second picture the arms are externally rotated with the palms up & correspondingly the forearms are also rotating outward – you will feel how this tensions the stretch differently & you’ll probably find it more of a challenge. See how far round (or not!) you can get your thumbs/backs of the hands flat to the floor! Head relaxed & breathing wiiiiide! Keep thinking about the same anchor points, this is not a flop-on-your-thighs-&-go-to-sleep kind of stretch, you want to be actively working on the position both with the breath & with the anchor points. As the intensity of the stretch dissipates you can try to reach a little further.
Lastly we’re working more laterally into the sides of the back by bringing one arm all the way across & anchoring onto the the other side. This time we breathe into that side – feel the skin stretch & try to expand it with each inhalation.


 If you travel a lot for work it can be hard to prioritise your own movement let alone specific exercise. This post is an aid to those trapped in their hotel rooms (!) and in need of some body maintenance to cancel out all the sitting, screen watching, suit and work shoe wearing (that also ‘cast’ your body into unhelpful postures).
 3 steps to improving your ‘sitters body’.
 Your body uses your proprioception system to create an image of what is internal or inside the skin – in much the same way as a dolphin uses sonar or an animal uses it’s whiskers. Proprioception literally means ‘ones own perception’ & that information about change of skeletal position travels by our neurones to the brain to act on. The more muscle fibres you have firing & the more supple (not tight) the tissue, the better the proprioception.
 Stand with your feet pelvis width apart & check your feet are straight (as in the outside edges, see pic) – how does this feel? Any wobbles? Now close your eyes & see if there’s any difference with them open or closed. Maybe you felt you moved about more with your eyes closed – this is the ‘true’ part of the balance test – your eyes are not part of the sensory input we speak about when we mean whole-body balance, they are not part of the proprioceptive system they are part of the vestibular system (eyes & inner ears) but the poorer your proprioceptive system is the more you rely on your eyes to make corrections. So in order to stop the eyes doing all the work (& incurring eye muscle fatigue, dizziness & age-related changes in vision) you need to fix your body’s internal sensory input or proprioceptive system.